What Is Threshold in Photoshop: A Concise Explanation
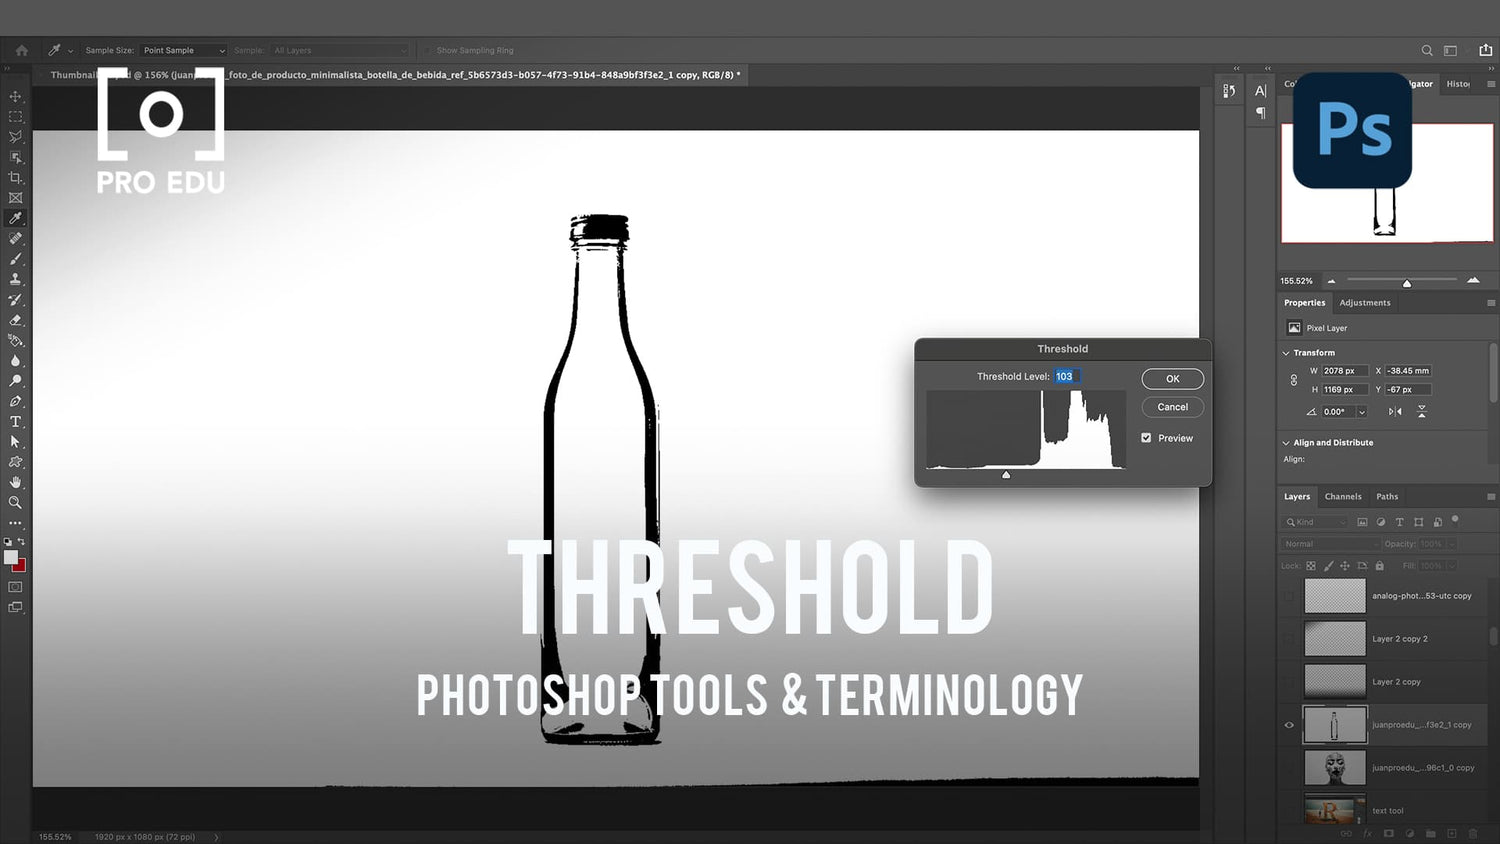
Threshold in Photoshop is an essential feature that enables users to transform images into high-contrast, black-and-white versions. By selecting a specific level as a threshold, the tool converts pixels lighter than the threshold to white and those darker to black. This powerful image adjustment can be used to enhance artistic effects, improve image clarity, or determine the lightest and darkest areas of an image.
Working with the threshold effect requires an understanding of layers and masks in Photoshop, allowing for greater control over the modifications. Advanced techniques, such as color selection and blending with gradients, can also be utilized to achieve unique visual results. With plenty of tutorials available, mastering the use of threshold in Photoshop can elevate your editing skills and lead to more effective digital art.
Key Takeaways
- Threshold in Photoshop allows for high-contrast, black-and-white image adjustments.
- Understanding layers and masks is crucial when working with threshold mode.
- Advanced techniques and tutorials can help elevate your threshold editing skills.
Basics Of Threshold In Photoshop
cIn Adobe Photoshop, the Threshold adjustment is a powerful tool to create high-contrast, black and white images. It converts an image into a one-bit representation by setting a specific brightness level, turning pixels either black or white.
This technique is useful for various graphical purposes, such as creating stencil images, isolating specific elements, and enhancing edge contrast. It's an important process to understand for those looking to strengthen their Photoshop skills.
To use the Threshold feature, we simply need to follow these steps:
- Open our desired image in Photoshop.
- Navigate to
Image > Adjustments > Threshold. - Adjust the slider in the pop-up window to set the desired brightness level.
Once we have our desired threshold value, clicks or areas in the picture will be turned into black or white based on their brightness. The result is a simplified, high-contrast representation of the original image.
Some additional techniques can help us achieve even better results with Threshold. For example, we can use the Dodge and Burn tools to selectively lighten and darken the underlying image before applying the Threshold effect. This helps to emphasize specific areas and improve the overall visual quality.
Remember, practice is key to mastering the art of using Threshold in Photoshop. Experiment with different brightness levels, and layering methods to discover unique and creative ways to utilize this fantastic tool.
Understanding Image Adjustments Using Threshold
When working with images in Photoshop, one of the most powerful and versatile tools is the Threshold adjustment. This feature allows us to transform a grayscale or colored image into black and white by separating the image into distinct foreground and background regions based on brightness levels.
We can master the Threshold tool by understanding its function within our workspace, as well as its relationships with color correction, contrast, and other image adjustments. To begin, we create a Threshold adjustment layer in the Layers panel. This non-destructive method preserves the original image, allowing us to experiment with various levels of light.
Once the Threshold adjustment layer is in place, the Levels slider becomes our key to fine-tuning the balance between black and white areas of the image. Moving the slider to the left or right controls the threshold value, which determines how the image is converted to black and white based on the light levels present in the image.
In conjunction with the Threshold adjustment, we can also use other tools like Dodge and Burn to selectively lighten or darken specific areas of the underlying image, giving us more precise control over the end-result (2 minute Photoshop). Additionally, employing further adjustments such as brightness and contrast or color correction can further refine our image and help to achieve the desired look.
In summary, mastering the Threshold tool in Photoshop opens up new creative possibilities for our images. Understanding its function within our workflow, and how it interacts with other adjustments and tools, allows us to take full advantage of this powerful feature.
Working With Layers And Masks In Threshold Mode
In Photoshop, working with layers and masks is essential for achieving desired effects. By using a threshold adjustment layer, we can manipulate the intensity of an image's colors based on a set level. This technique is particularly useful when working with images that need specific adjustments based on brightness levels.
To begin, open the Layers panel and create a new adjustment layer. Select the Threshold option to add a threshold adjustment layer to your project. This will convert your image into a black and white representation with a slider to control the threshold level.
Now, adjust the slider to the desired level that captures the details you wish to work on. This will leave you with a high contrast image, ideal for creating precise layer masks. It's important to note that when creating a mask, white areas reveal the content of the layer while black areas hide it.
Once you have set your threshold level, it's time to create clipping masks to isolate specific adjustments. By right-clicking the adjustment layer and selecting Create Clipping Mask, you will apply the adjustment to only the layer immediately below it in the layers panel, preserving the original image in other layers.
With a clipping mask created, move on to adjusting the opacity of the layer to fine-tune your effect. In the Layers panel, you can change the opacity value to increase or decrease the transparency of the layer.
In summary, using threshold adjustment layers in combination with layer masks and clipping masks allows us to create precise, targeted effects in our images. By adjusting the opacity of each layer, we can control the overall intensity of the changes we make, ensuring our final output is a carefully balanced and visually appealing piece.
Advanced Techniques: From Color Selection To Gradients
In our creative process, we often use the color picker to select specific colors from an image and enhance them. By adjusting the shadows and highlights, we can create a balanced image that has depth and contrast.
Another useful technique is manipulating hue and saturation. These adjustments can change the overall mood of an image, and are common in creating stylized effects. We often combine these adjustments with the use of filters and presets to speed up our workflow.
When focusing on retouching, we like to use gradients to achieve smooth transitions between colors. Gradients are a powerful tool that adds depth to our designs and enhances the overall look of an image. For more advanced effects, we might invert certain colors or apply color balance, color lookup, or selective color adjustments.
In summary, our workflow includes changes to color, brightness, contrast, and blending through techniques like:
- Color picker
- Shadows and highlights
- Hue and saturation
- Filters and presets
- Retouching tools
- Gradients
- Effects and design elements
- Invert, color balance, color lookup, and selective color adjustments
These advanced adjustments help us create visually appealing designs and ensure a polished final result.
Improving Skills Through Tutorials And Additional Adobe Products Resources
There are a variety of resources available for learning and improving your Photoshop skills, including tutorials and guides on different Adobe products. As we experiment with various tools such as the Dodge and Burn, Posterize, and Threshold in Photoshop, we will be able to gain a better understanding of how to manipulate visuals for the desired effect. One effective method for learning these tools and more is through tutorials and guides available on websites like Adobe's HelpX.
When working on images in Photoshop, we often come across terms like RGB Image, Curves, and Color Tables. To become more proficient in using these elements, it's essential to consult relevant tutorials and practice regularly. We can also benefit from exploring additional Adobe products like Illustrator and Camera Raw which offer complementary skills and techniques, enhancing our overall proficiency in image editing.
In order to streamline our editing workflow, learning about Adjustment and Fill layers can be instrumental. These layers allow us to apply non-destructive edits, meaning we won't permanently alter the original image. Additionally, understanding Blending Modes and Quick Actions will help us customize our approach, leading to more effective results as we continue to improve our skills. A good starting point for learning about these concepts is the Adobe User Guide.
Utilizing Pen Tools and other precision editing tools in both Photoshop and Illustrator can help us in our pursuit of mastery. Familiarizing ourselves with the Levels command and Photo Filter can also enhance our ability to make nuanced color and tone adjustments. As we continue to learn and practice, we will undoubtedly become more skilled in the art of image editing through the use of these powerful Adobe tools and resources.
Frequently Asked Questions
How can I apply Threshold adjustment nondestructively?
We can apply the Threshold adjustment nondestructively by using an adjustment layer. Go to Layer > New Adjustment Layer > Threshold. This way, the effect will be added to a separate layer, allowing you to edit or remove it without affecting the original image.
What does the Threshold effect accomplish?
The Threshold effect in Photoshop converts gray-scale or color images into high-contrast, black-and-white images. By setting a specific level as a threshold, all pixels lighter than the threshold are converted to white, and all pixels darker are converted to black.
How to create smooth transitions in Threshold?
Creating smooth transitions in a Threshold effect can be achieved by using the Dodge and Burn tools after applying the Threshold adjustment layer. The Dodge tool helps lighten areas, while the Burn tool helps darken areas, resulting in a smoother black-and-white image with more controlled contrast.
Why is the Threshold option greyed out?
The Threshold option might be greyed out if your image is in a color mode that does not support the Threshold effect. To fix this, go to Image > Mode and change the color mode to any of the following: Grayscale, RGB, or Lab Color.
How does radius and threshold affect images in Photoshop?
Radius and threshold parameters in Photoshop filters determine the intensity and area of the effect applied to the image. The radius controls the extent of the area, whereas the threshold determines the level at which the effect is applied, such as the difference between adjacent pixels or the level of noise removal.
How can I apply Threshold effect to text in Photoshop?
To apply the Threshold effect to text, first convert the text layer into a rasterized layer by right-clicking the text layer and choosing "Rasterize Layer" or "Rasterize Type". Then, you can either apply the Threshold effect directly to the rasterized layer or create an adjustment layer as described in the first FAQ.


