What Is Sharpen in Photoshop: A Concise Guide for Better Image Quality
Adobe Photoshop is a powerful photo editing software, and one of its essential features is the ability to sharpen images. Sharpening in Photoshop mainly enhances the details and contrast of an image by adjusting the pixel values and removing some of the blur. This process adds depth and clarity to the image, making it more visually appealing.
Numerous tools and techniques can be used to sharpen images in Photoshop, each with their specific purpose and effect. For example, you can choose between filters like the Unsharp Mask or Smart Sharpen, or even use the High Pass filter as an alternative. Understanding these options and learning how to apply them will greatly improve your photo editing skills.
Key Takeaways
- Sharpening in Photoshop enhances image details and contrast by adjusting pixel values
- Multiple tools and techniques are available for sharpening, including Unsharp Mask, Smart Sharpen, and High Pass filter
- Improving your understanding and application of these options will elevate your photo editing skills
Understanding the Concept of Sharpening in Photoshop
In Photoshop, sharpening refers to the process of increasing the clarity and focus of an image. It works by enhancing the edges and details of objects within the image, making them appear crisper and more defined.
One way to achieve sharpening is through a variety of built-in tools and filters in Photoshop. For example, the Sharpen Tool allows for manual control, while the Unsharp Mask and Smart Sharpen filters offer more automated functionality.
It's important to note that different sharpening techniques work in unique ways. High Pass filter, for instance, is a popular method for sharpening images. However, the effectiveness of each technique will depend on the specific needs and circumstances of each project.
When sharpening an image, it is crucial to strike a balance. Over-sharpening can lead to a loss of image quality and introduce unwanted artifacts, while under-sharpening can make the image appear dull and lack focus.
In summary, sharpening in Photoshop is a valuable technique for enhancing the focus and details of images. By carefully choosing and applying suitable methods, we can significantly improve the overall visual appeal and clarity of our work.
The Tools for Sharpening in Photoshop
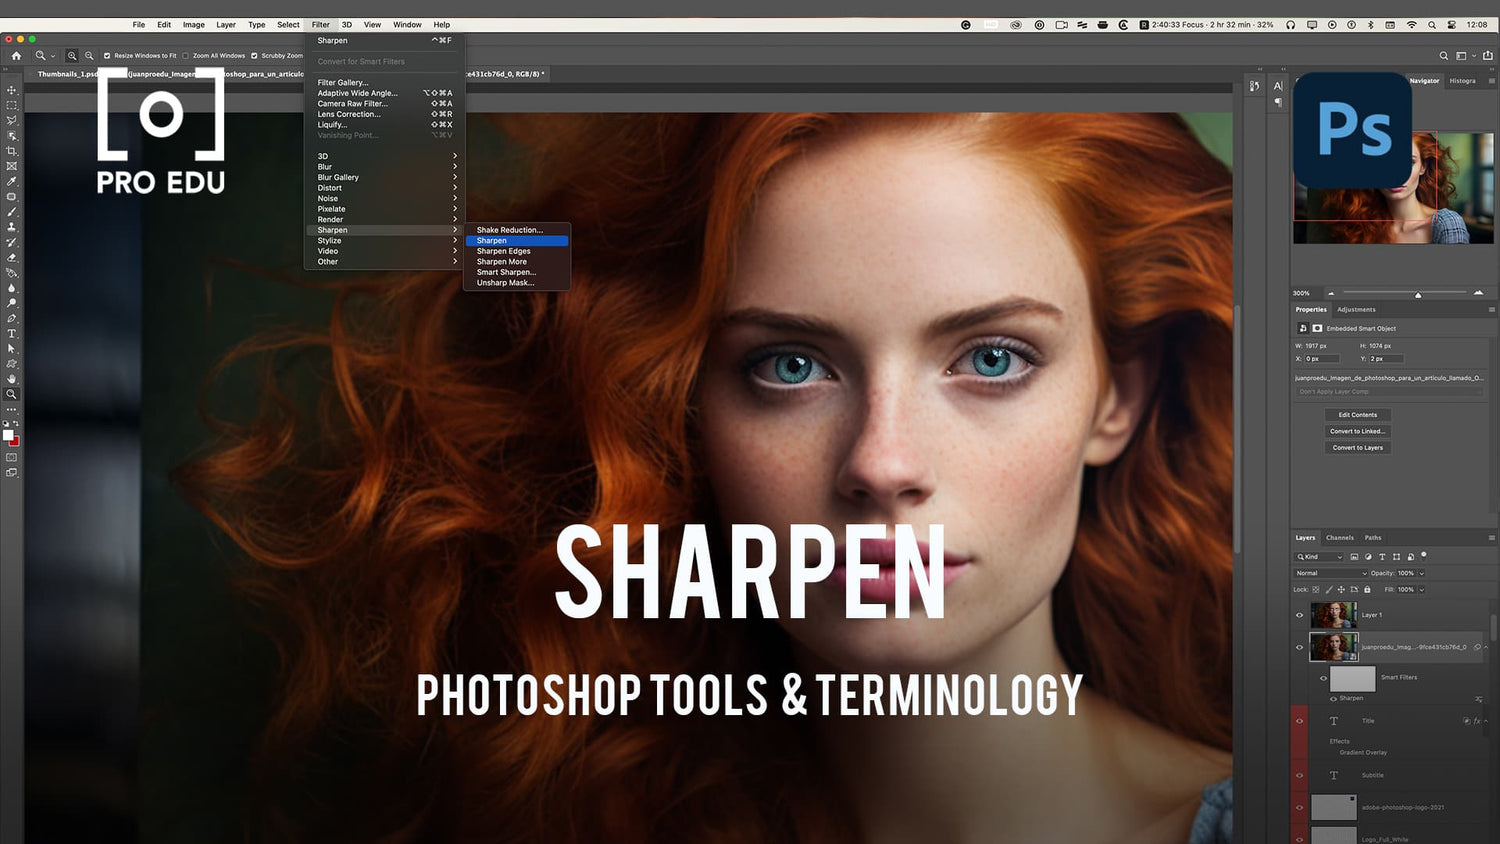
In Photoshop, there are several tools available for sharpening images. We'll cover a few of the main options in this section, including the Sharpen Tool, the Unsharp Mask, and the Smart Sharpen filter.
The Sharpen Tool is found in the toolbar, often alongside the Blur Tool. To select it, click and hold the Blur Tool, then choose the Sharpen Tool from the displayed options. With this tool, we can control the blending mode and strength value, giving us precise control over the image sharpness. Learn more about the Sharpen Tool in this Adobe guide.
In addition to the Sharpen Tool, both the Unsharp Mask and Smart Sharpen filters offer more advanced methods for adjusting an image's sharpness. These filters provide more options and technology to enhance image quality, especially when dealing with complex or large images. Discover valuable tips and techniques on using these filters in this How-To Geek article.
When deciding which tool to use, consider your image's needs and the level of control you require. While the Sharpen Tool is great for quick enhancements, the Unsharp Mask and Smart Sharpen filters provide greater customization and precision. Successfully sharpening an image can significantly improve its overall appearance and emphasize essential details. Remember, in addition to these tools, Photoshop also offers a variety of other filters and masks for fine-tuning your work.
Deep Dive into Sharpening Techniques
In Photoshop, image sharpening is a crucial technique to enhance the details and quality of an image. One of the most common methods involves adjusting the amount, radius, threshold, and drag parameters through various tools and filters 1. Let's explore how these techniques can enhance our images.
To start, the amount setting plays a critical role in the overall sharpening effect by controlling the intensity of the enhancement 2. When adjusting the amount, it is crucial to strike a balance to avoid over-sharpening or under-sharpening the image.
The radius parameter defines how far from an edge pixels are affected by the sharpening 3. In most cases, a smaller radius works best for images with intricate details, whereas a larger radius works better for images with broader, less intricate details.
The threshold setting enables us to exclude areas from sharpening based on pixel contrast differences 4. By increasing the threshold value, fewer areas are impacted by the sharpening, ensuring only the high-contrast regions get sharpened.
With the drag feature, we can apply increasing amounts of sharpening as we apply more pressure on our stylus or mouse 5. This can help us achieve precise control over sharpening by enabling us to focus on specific areas rather than sharpening the whole image.
Working with Smart Objects allows us to apply non-destructive sharpening techniques, giving us more flexibility to tweak and adjust the sharpening effects 6. By converting the image layer into a Smart Object, any filters applied can be adjusted and modified without permanently altering the original image.
Lastly, adjusting the strength value provides us with another way to control the intensity of the sharpening effect 7. By carefully fine-tuning the strength value, we can achieve the desired sharpening level for our images.
In conclusion, understanding and mastering these sharpening techniques allows us to enhance our images more effectively, creating visually stunning and high-quality results.
Utilizing Layers and Filters for Sharpening
In Photoshop, we can use the Layers panel and various filters to enhance the sharpness of our images. This can bring out small details and make the overall image appear more crisp and clear. One of the most effective methods we recommend is using a combination of the Unsharp Mask filter and the Smart Sharpen filter.
First, we will make sure the Layers panel is visible on the right side of the screen. If it isn't, simply click on Window > Layers. Next, duplicate the layer you wish to sharpen in Photoshop. This will allow us to apply filters to the new layer while keeping the original layer intact.
For a general sharpening effect, try using the Unsharp Mask filter. To access this tool, go to Filter > Sharpen > Unsharp Mask. The Unsharp Mask filter offers various settings, such as Amount, Radius, and Threshold, which can be adjusted to achieve the desired level of sharpness.
As an alternative, consider using the Smart Sharpen filter. This filter can provide more precise sharpening results than the Unsharp Mask filter. To apply the Smart Sharpen filter, go to Filter > Sharpen > Smart Sharpen. This filter offers advanced settings, such as Remove, Radius, and Reduce Noise, which can be configured to refine the final sharpening effect.
Another technique for sharpening images involves using blur filters. By applying a subtle blur to a layer and then blending it with the original image, we can create a sharpening effect. While this method may not be as straightforward as using the Unsharp Mask or Smart Sharpen filters, it does offer more flexibility in terms of achieving a custom sharpening effect.
By working with the Layers panel and experimenting with different filters, we can dramatically enhance the sharpness of our images in Photoshop. It's important to remember that a combination of different techniques and filters may be needed to achieve the desired level of sharpness.
Effective Workflow in Image Sharpening
In order to create an efficient workflow for image sharpening, it is essential that we start by processing our images in a program like Adobe Camera Raw. This will allow us to perform initial adjustments, such as exposure correction and color balancing, before importing the image into Adobe Photoshop.
Once our image is in Photoshop, the first step is to create a duplicate layer. This action ensures that we always have the original image as a reference, and it allows us to work on a separate layer without affecting the background image. To duplicate a layer, simply right-click on your background layer and choose "Duplicate Layer."
Before sharpening the image, we should analyze it and, if necessary, reduce noise. A noisy image can become more pronounced after sharpening, so it's advisable to address this issue beforehand. We can use Photoshop's built-in noise reduction tools, such as the "Reduce Noise" filter, which can be found under the "Filter" menu.
When it comes to sharpening, there are several tools and techniques to choose from in Photoshop. Some popular choices include:
- Unsharp Mask: A useful method for sharpening images by increasing contrast along the edges. Can be found under "Filter" > "Sharpen" > "Unsharp Mask."
- High Pass Filter: An alternative method that focuses mostly on high-frequency details. Can be found under "Filter" > "Other" > "High Pass."
- Smart Sharpen: A smart and powerful filter that allows more control over the sharpening process. Can be found under "Filter" > "Sharpen" > "Smart Sharpen."
Finally, after applying the desired sharpening technique, it is crucial to fine-tune the intensity and blend mode settings to achieve the optimal level of sharpness. We can do this by adjusting the opacity and blend mode of the duplicate layer. Popular blend modes for sharpening are "Overlay," "Soft Light," and "Hard Light."
By following this workflow, we can efficiently sharpen our images in Adobe Photoshop and achieve professional results. Remember to always work on a duplicate layer, pay attention to noise reduction, and experiment with various sharpening techniques to find the best fit for your image.
Sharpening for Different Mediums
When working with Photoshop, it's essential to understand the significance of sharpening for different mediums. The technique and amount of sharpening needed can vary depending on the medium, such as web, print, or NEF formats.
For web usage, image size and compression play a crucial role in determining the level of sharpening required. Smaller images might need less sharpening, while larger images could need more adjusting of sharpness to maintain clarity.
Photos intended for print, on the other hand, typically require higher resolution and additional sharpening. This is because the traditional print process can result in slight blurring of the image's edges. For this medium, it's important to use separate layers for sharpening to ensure you apply the proper amount and type of sharpening without affecting the original image.
Working with NEF (Nikon Electronic Format) files, which are raw images, involves a different approach. Raw images often appear softer and require some additional sharpening to achieve the desired detail. As with other formats, creating separate layers for sharpening is recommended to maintain flexibility and image quality.
Regardless of the medium, it's vital to be cautious with sharpening adjustments, as overdoing it can introduce unwanted artifacts and degrade image quality. By understanding the specific needs of each medium, we can ensure that our images are optimized and appear their best across various platforms.
Frequently Asked Questions
How does the Smart Sharpen tool work in Photoshop?
The Smart Sharpen tool in Photoshop works by applying a level of sharpening to an image while minimizing the artifacts often caused by other sharpening methods. It allows you to adjust settings like the radius, amount, and even noise reduction for a more precise result. Adobe's guide on Smart Sharpening provides more information on how to use this tool effectively.
What is the best method to sharpen edges in Photoshop?
There are several methods available for sharpening edges in Photoshop, but one of the most commonly used techniques involves the High Pass filter. The High Pass filter allows you to selectively sharpen only the areas containing edge details, which helps preserve the overall image quality. You can learn more about using this method in this comprehensive guide.
How can I sharpen a pixelated image using Photoshop?
Sharpening a pixelated image in Photoshop may not always produce perfect results, but it can lessen the pixelation effect. One way to achieve this is by using the Unsharp Mask filter with careful adjustments to the settings. Another option is to use the Smart Sharpen tool that provides more control and precision. However, it's essential to remember that successful results greatly depend on the quality of the original image.
What are the main differences between sharpening tools in Photoshop CS6 and other versions?
While there have been some improvements and additions to the sharpening tools in newer versions of Photoshop, the core functionality remains relatively consistent. Photoshop CS6 and later versions include the Smart Sharpen tool, which provides more advanced sharpening options like noise reduction and fine-tuning of the sharpening effect. Additionally, Photoshop CC introduced the Shake Reduction filter, specifically designed to correct blurry images caused by camera shake.
How does the sharpen tool improve image quality in Photoshop?
The sharpen tool in Photoshop works by increasing the contrast along the edges of an image. This added contrast can give the illusion of a more defined, clearer image, which in turn improves the overall appearance. When used correctly, the sharpen tool can enhance the details in your image and make it look more polished. Check out Adobe's guide on using the Sharpen tool for more information.
Can I achieve professional image sharpening results using Photoshop?
Yes, Photoshop offers a wide range of sharpening tools and techniques that can achieve professional-level image sharpening results. With the correct knowledge and understanding of these tools, you can achieve excellent results. There are various tutorials available, like this step-by-step guide on how to sharpen in Photoshop Elements, to help you produce professional-quality images.


